
Winterize Your RV
If you live anywhere that experiences freezing temperatures, winterizing your RV isn’t optional—it’s essential.
You can certainly have your local RV dealer do it for you, and for many people that’s the easiest option. But if you’re like us, you’d rather spend a little time learning the process and save the money.
Before you get started, do a little homework.
- Read your owner’s manual. Many manufacturers include detailed winterizing instructions specific to your RV.
- Watch a few YouTube videos. You may even find one covering your exact make and model.
- Ask friends who own RVs how they winterize theirs.
A Quick Note: Every RV is a little different. Plumbing layouts, valves, water heaters, and winterizing procedures can vary by manufacturer and model. The steps below describe the process I use on our Keystone Cougar and have worked well through several Minnesota winters. If your owner’s manual differs from anything I’ve written here, always follow your manufacturer’s recommendations.
Once you’ve done a little research, you’ll probably discover that the process is easier than you expected.
I’ve followed the procedure below for the past several Minnesota winters without any problems. There are different ways to winterize an RV, and everyone has their favorite method, but this one has worked well for us.
I’ll add photos to this article once camping season returns. Right now, our fifth wheel is tucked away for the winter.
What You’ll Need
- Up to 7 gallons of RV antifreeze (I buy it during the off-season when it’s often under $3 per gallon.)
- Adjustable wrench
- Pliers
- Small funnel
- Air compressor
- Blow-out adapter for your city water connection (about $6 online)
- Short hose for your RV’s winterizing connection (if equipped)
Once you’ve done it a couple of times, the entire process takes about an hour to an hour and a half.
Having a helper makes things easier, but it’s certainly a one-person job if necessary.
Step 1: Empty the Holding Tanks
Start by thoroughly dumping and flushing both your black and gray water tanks.
Step 2: Drain the Water System
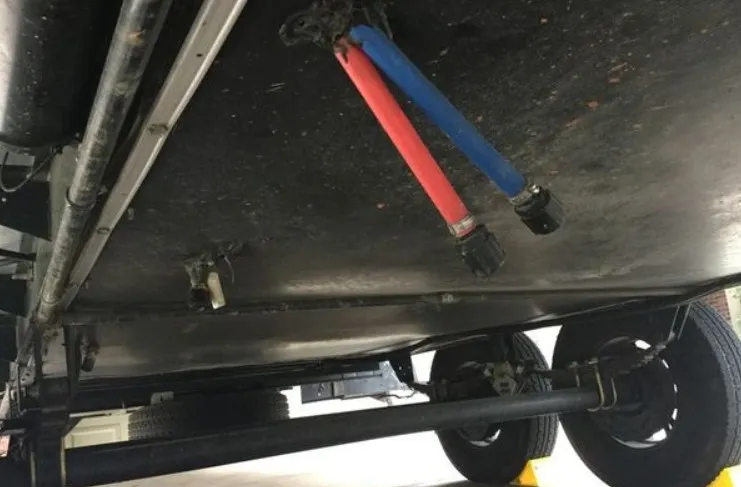
Locate your low-point drains. Most RVs have two drain tubes underneath the trailer—typically one red (hot) and one blue (cold).
If you can’t find them, consult your owner’s manual.
Turn your water heater bypass valve to the Bypass or Winterize position.
Open the low-point drains, then open every hot and cold faucet inside the RV, including the shower, toilet, and outside shower if you have one.
While everything is draining, open the fresh water tank drain and empty the tank.
Step 3: Inspect the Water Heater
Remove the anode rod from your water heater.
Inspect it for wear and replace it if necessary.
Keep in mind that the water heater may still be under pressure, so open it carefully—you may get a little wet.
Once everything has finished draining, close the low-point drains and the fresh water tank drain.
Step 4: Blow Out the Water Lines
Attach the blow-out adapter to your city water connection.
Important: Set your air compressor to no more than 20 PSI. Higher pressure can damage your RV’s plumbing.
Starting with the fixture farthest from the water connection, open each hot and cold faucet until only air comes out.
Repeat the process for:
- Kitchen sink
- Bathroom sink
- Shower
- Toilet
- Outside shower or spray port
Some RV owners stop here.
I don’t.
Step 5: Add RV Antifreeze
We have a significant investment in our RV, so I like the added protection of filling the plumbing with RV antifreeze.
If your RV has a winterizing hose and valve, connect the hose and place it directly into a jug of RV antifreeze.
If it doesn’t, pour several gallons of RV antifreeze into the fresh water tank using a funnel.
Turn on the water pump.
Starting at the fixture farthest from the pump, open each hot and cold faucet until bright pink antifreeze flows from the fixture.
Repeat the process for:
- Kitchen sink
- Bathroom sink
- Shower
- Toilet
- Outside shower or spray port
If you’re drawing antifreeze directly from the jugs, it’s helpful to have someone replace the empty jugs while another person operates the faucets.
Once every fixture is flowing pink, your plumbing lines are protected.
Step 6: Verify the System
Open the low-point drains briefly.
If pink antifreeze comes out, you’ll know the plumbing is fully protected.
Close the drains when you’re finished.
Step 7: Protect the Holding Tanks
Our Cougar has two gray tanks and one black tank.
I pour approximately one gallon of RV antifreeze into each holding tank, making sure to run some through every sink, shower, and the toilet so that each P-trap contains antifreeze as well.
Step 8: One Final Walk-Through
Before locking up your RV for the winter, make one last pass through the interior.
Remove anything that could freeze, including:
- Canned goods
- Bottled liquids
- Aerosol cans
- Cleaning supplies
- Food
Nothing ruins the start of camping season faster than finding an exploded can or bottle inside a cabinet.
You’re Done!
Congratulations—you’ve successfully winterized your RV.
Besides knowing the job was done correctly, you’ve probably saved yourself around $150 in dealer service charges.
That’s money you can put toward your first camping trip next spring.
One Last Thought
Winterizing your RV isn’t difficult, but taking shortcuts can become expensive. Spend an extra hour doing the job properly in the fall, and you’ll have one less thing to worry about when camping season returns.